Few weeks ago, I built EasyLog, a lightweight library that make verbose logging easy and fun.
In this quick tutorial, I will walk you through the steps to create library with Swift Package Manager and how to distribute it on Github to make it available to the community. You will also see how to make use of the library by integrating and using it in a new Xcode project.
Without further ado, let’s jump in 💪
Open up Xcode and select File\New\Swift Package from the menu. You can also do the same by selecting File\New\Project\Multiplatfrom\Swift Package
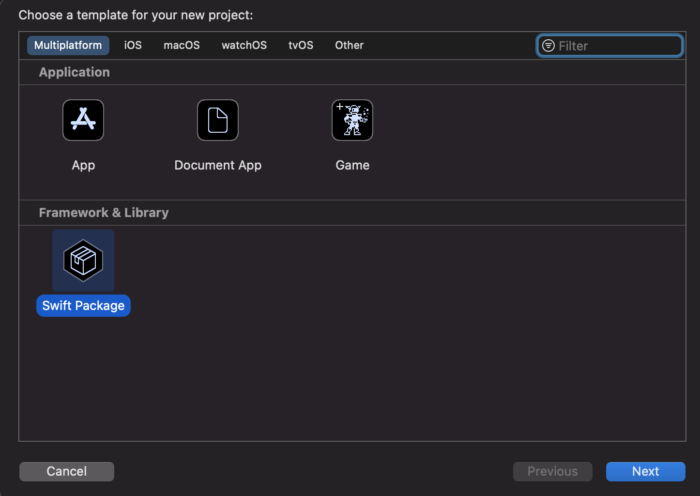
You will make a lightweight library to help log useful informations about the code that use it. For this, I call the project EasyLog 😁
Xcode will also prompt you if you want to put your project under Git source control, make sure to check it.

Xcode did a lot configuring a start project with us, let’s explore it the files in the Project navigator :
README.md: In this file you will document everything that may help other users make use of your code, this includes a description of the library and steps on how to install and use it.
Package.swift: This file is mandatory and serves as a configuration file for the swift package you are developing. If you used CocoaPods before, Package.swift role is similar to the .podspec file.
Sources: As its name can tell, you put all your package source files under this folder. This includes swift files and any resource type files (xib, strings files, assets, etc).
Tests: Like any Xcode project, Unit tests and UI tests will be put here. You will test your library at the end of this tutorial, stay tuned 🙂
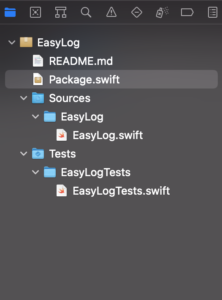
Next you will implement the core code of the library, under Sources\EasyLog, Xcode already created a default file with the same name as the Swift Package (EasyLog.swift), remove the file and create two new files (File\New\File\Swift File), call them Logger and LogEvent respectively.
Your source folder should now look like the following:
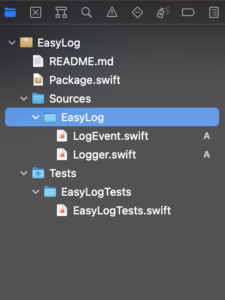
Select Logger.swift and change its content to the following:
import Foundation

public struct Logger {

  // MARK: - Properties

  var dateFormatter: DateFormatter!

  // MARK: - Init

  public init() {
    self.dateFormatter = DateFormatter()
  }

  public func d(object: Any,
                file:String = #file,
                line:Int = #line,
                function: String = #function ) {
    print(string: "[\(date())] [\(fileName(fromFilePath: file))] ⎯ [Line \(line)] ⎯ \(function) \(LogEvent.d.rawValue) ⎯ \(object)")
  }
  public func e(object: Any,
                file:String = #file,
                line:Int = #line,
                function: String = #function ) {
    print(string: "[\(date())] [\(fileName(fromFilePath: file))] ⎯ [Line \(line)] ⎯ \(function) \(LogEvent.e.rawValue) ⎯ \(object)")
  }
  public func i(object: Any,
                file:String = #file,
                line:Int = #line,
                function: String = #function ) {
    print(string: "[\(date())] [\(fileName(fromFilePath: file))] ⎯ [Line \(line)] ⎯ \(function) \(LogEvent.i.rawValue) ⎯ \(object)")
  }
  public func v(object: Any,
                file:String = #file,
                line:Int = #line,
                function: String = #function ) {
    print(string: "[\(date())] [\(fileName(fromFilePath: file))] ⎯ [Line \(line)] ⎯ \(function) \(LogEvent.v.rawValue) ⎯ \(object)")
  }
  public func w(object: Any,
                file:String = #file,
                line:Int = #line,
                function: String = #function ) {
    print(string: "[\(date())] [\(fileName(fromFilePath: file))] ⎯ [Line \(line)] ⎯ \(function) \(LogEvent.w.rawValue) ⎯ \(object)")
  }
  public func s(object: Any,
                file:String = #file,
                line:Int = #line,
                function: String = #function ) {
    print(string: "[\(date())] [\(fileName(fromFilePath: file))] ⎯ [Line \(line)] ⎯ \(function) \(LogEvent.s.rawValue) ⎯ \(object)")
  }
  fileprivate func print(string: String) {
    #if DEBUG
    Swift.print(string)
    #endif
  }
}
extension Logger {
  fileprivate func fileName(fromFilePath path: String) -> String {
    let components = path.components(separatedBy: "/")
    return components.isEmpty ? "" : components.last!
  }
  fileprivate func date() -> String {
    // Transform and return the date at the call of this method to String
    dateFormatter.dateFormat = "yyyy-MM-dd HH:mm:ss"
    return dateFormatter.string(from: Date())
  }
}
One of the crucial elements while printing logs is timestamp, that’s why the class instantiate a date formatter at init time to use while printing logs to the console.
The class implements six different instance methods:
func d for debug: You would use this method most of the time to print affirmative and success logs (network success callback).
func e to print error logs.
func i for informative log messages
func v for verbose logs
func w for warning logs (ie: memory performance logs, swift lint warnings).
func s for serious failure logs (ie: Failed assertion Unit Tests).
Each method of the above takes the same list of parameters:
- object: The object message you want to print along with the logs usually you would want to pass a string message.
- file, line, function: All these parameters are special literals that store information about the file, line and function respectively at the moment they are called.
I also put two private functions, fileName to format the file name since the #file literal contains the full path of the file, and date to return the full date and time in which the log event occurred 👌🏻
Last but not least, I thought it is better to delegate all print actions to another method, that is why I extracted the print statement to a private function, called print. This function will check whether the code is running in Debug mode, otherwise no print logs will be performed. This totally make sense since you wouldn’t want to leak your code logs in production mode ⚠️
To finish up with your library implementation, select the LogEvent.swift from the Project navigator and implement the following code inside:
public enum LogEvent: String {
    case e = "❤️" // Error
    case d = "💚" // Debug
    case i = "ℹ️" // Info
    case v = "🔬" // Verbose
    case w = "⚠️" // Warning
    case s = "🔥" // Severe
}
This is a simple Enum that contains different icons for the log types. I think it is good to show an icon along with the log message since it is catched easier while you visualise your console heavy logs 🙂
At this point, you can build the project, you should get the following compiling error regarding the default unit test that Xcode created for you at the moment of the project setup.
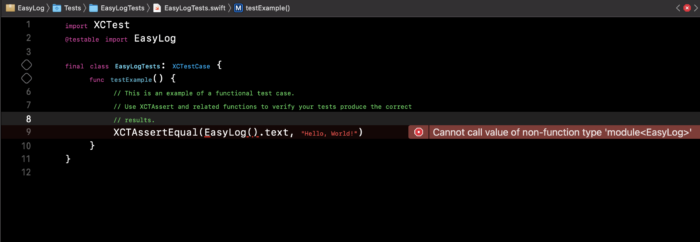
Remove all the content inside the EasyLogTests class and change it with the following:
 // MARK: - Properties

  var logger: Logger!

  override func setUpWithError() throws {
    logger = Logger()
  }

  override func tearDownWithError() throws {
    logger = nil
  }

  func testLogger_WhenInitiated_IsNotNil() {
    XCTAssertNotNil(logger)
    XCTAssertNotNil(logger.dateFormatter)
  }
The testLogger_WhenInitiated_IsNotNil method above will test if a logger object is successfully created and if the instance property dateFormatter is not nil. This is the minimum of tests that you should think about for your tiny library.
Run the test (cmd+U) and make sure the assertions successfully passed ✅
Distribute the library as a Swift Package
You are all set, the library is ready to ship to the community. Since Github is seamlessly integrated with Xcode, you will use it as a host for your code.
Start by creating a repository on your Github account, I called mine EasyLog as the name of the library.
From the home page of the repository on GitHub, copy the ssh url of the repo as you will need it to push your code from your local machine.
Your ssh url should be something like this:
git@github.com:mal3k/EasyLog.gitOpen the Terminal and cd to your Xcode project root, for my case I put my code in a folder I named “Projects”:
$ cd ~/Projects/EasyLogYour Swift Package project is already under git source control since you asked Xcode to create a git repository for you earlier, however it doesn’t track any remote repository yet. To do that, type the following command:
git remote add origin git@github.com:mal3k/EasyLog.gitChange the repository url with yours, the one you copied earlier 🙂
Github put all your code in a default branch called main, however Xcode doesn’t seems to recognise this branch while trying to fetch and install the Swift Package in a later stage. To overcome this, you need to checkout all your code to a new branch master.
git checkout -b masterTo make sure you are on the master branch, type the following command:
git branchThe command above should highlight master in the output, this way you are sure you work on the master branch 😉
The las thing is to commit and push your first version of the code:
git add .
git commit -m "Initial commit"
git tag -a 0.1 -m "Release 0.1"
git push origin master
git push origin 0.1
Use the library in a new Xcode project
Now that the library is on GitHub, time to make use of it. After all this is the purpose of a reusable code 🤔
Create an iOS App project (File\New\Project\iOS\App) and call the project whatever you want.
Once the project is created, select File\Swift Packages\Add Package Dependency from the menu. Enter the GitHub url of the your library repository in the search bar then press enter.

If Xcode successfully fetched the library, next screen is displayed to choose package options, something like this:
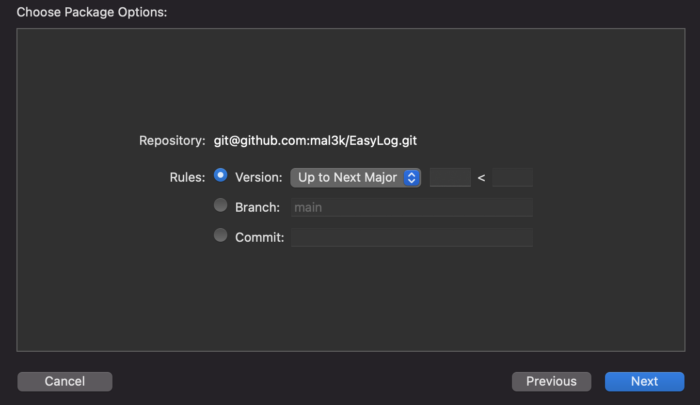
Xcode provides you with three options to import the Swift Package, either you do that by tag number or branch name or even the commit sha. Isn’t that cool?
Let’s use the first option since you already tagged a 0.1 version.
Enter 0.1 as the release tag you want to import and click Next.
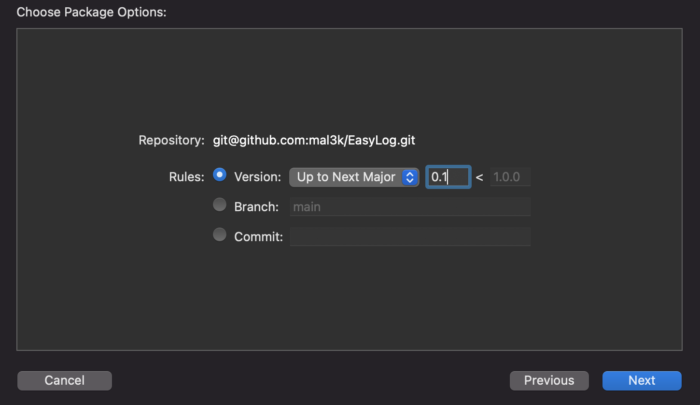
If Xcode correctly fetched the Swift Package then you should see the following screen:
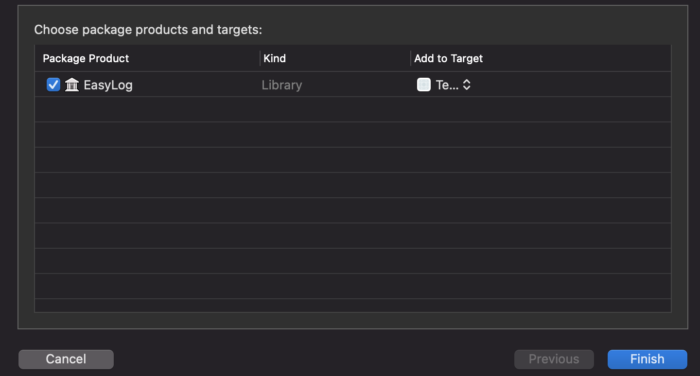
Click Finish, Xcode should add the Swift Package to the project dependencies and the Project navigator structure should look like the following:
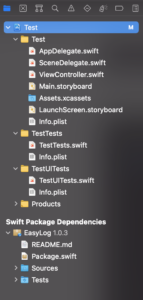
Explore your library folders and see how all the code you added earlier is there.
Now in order to start using the library, select ViewController.swift from the Project navigator, import EasyLog at the top of the file and add the following statements to the viewDidLoad function:
let logger = Logger()
logger.d(object: "viewDidLoad called")
Run the project and you should see your custom log in the console:

Where to go from here?
Congratulations, you just made your Swift Package library, there is a lot to learn, I recommend you the official guide from Apple as a start 🙂
Discover more from SweetTutos
Subscribe to get the latest posts sent to your email.